New Release D3D9Client Development

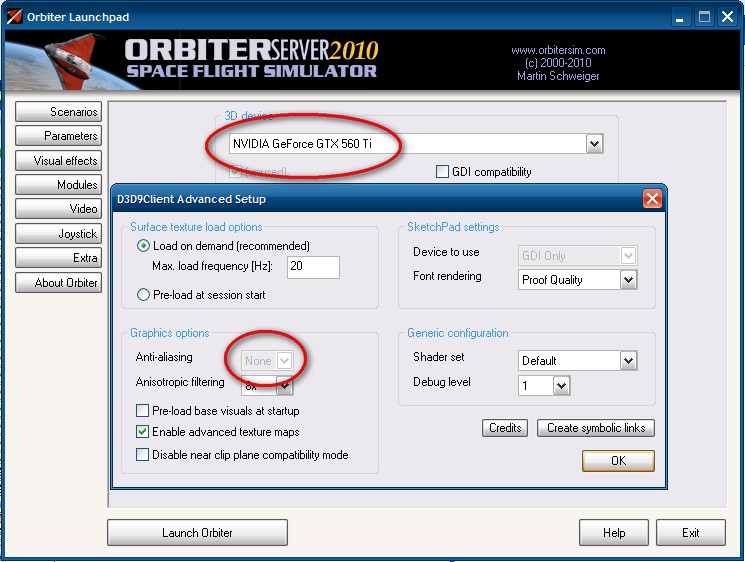
This is the line that will combine diffuse color, night lights and specular reflection. vEff.rgb is the night light color and the intensity is controlled by aux.a (aux.w). So, it looks like something is mixing up the vector components in your computer. (vEff.a is the specular water/land mask)

A vector component like aux.a (or aux.w) can be also addressed as frg.aux[3]. The index is from range 0 to 3. You could change all frg.aux.* to use the format frg.aux
[*] from the PlanetTechPS section.

I have seen the tiling effect a few times after installing a broken add-on. The texture file is probably corrupt. Does it occur in a clean installation.

Of course, all these anomalies could be caused by the same problem with the effect compiler or with the GPU.

Thanks. It still happens with a clean Orbiter installation. I tried the frg.aux
[*] solution and the nightlights came back. When I entered the line frg.aux[1]=0, which I suppose is equivalent to the earlier fix (frg.aux.b=0), it removed them again. It seems this is going to be the only workaround for my not too good integrated graphics chip.

Thanks for your help.
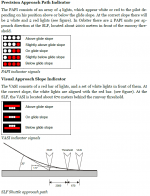
 
Hello Jarmo,

Glad to see you on duty :cheers:

---------------------------------------------------------------------------------------------------------
I have maybe a bug, the Antialias selector is grayed out but is perfectly supported, when I change manually
SceneAntialias = 8, the scene is perfect and look uggly with SceneAntialias = 0.
(which is the setting by default when you go to advanced then exit)

JarmoRC45Bug.jpg


----------------------------------------------------------------------------------------------------------
I confirm the MFD bug is cleared. I'll test the DGIV animations soon and report.


-----------------------------------------------------------------------------
About DGIV-3 I think it will be ready start of September as UCGO Arrow Freighter OrbiterSound and UMmu. All compatible with clients graphics.
-----------------------------------------------------------------------------
 
Last edited:
I have maybe a bug, the Antialias selector is grayed out but is perfectly supported, when I change manually
SceneAntialias = 8, the scene is perfect and look uggly with SceneAntialias = 0.
(which is the setting by default when you go to advanced then exit)

I have found the bug and it will be fixed in RC46.
 
I am happy to report that that jittering with the external view when using the mouse to rotate around objects, are gone with RC 45.
My frame rates also improved to about 10 to 15 fps increase overall.
The antialias which is greyed out can cause some problems.
When manually edit it to 8 it work fine.
But as soon as I go to the advance video tab, it reset it to 0 again.
 
D3D9Client RC46

Here is RC46

- PAPI Lights moved to center line
- Setup dialog fixed
- Stereo convergence and field depth settings added in the setup dialog

I'll try to get the vessel force vectors operational and after that we attempt a launch of D3D9Client R1. So, what's the launch readiness at this time ? I am planing to leave the Trains, and Solar arrays out of the payload.
 
Last edited:
Nice to have you back jarmonik. Just one that needs fixing: PAPI lights should be along the runway centerline. Currently D3D9Client places them off to one side like the VASI lights.

I just flew a quick landing into Wideawake with RC46 and I'm wondering about the PAPI lights being located along the centreline...

Is this a special 'Shuttle-ism' for the PAPI lights because at every airport I have ever landed at, I have never seen PAPI lights on the centre of the runway.

[ame]http://en.wikipedia.org/wiki/Precision_Approach_Path_Indicator[/ame]

If you look at the link above with a picture of an actual PAPI light, OK it looks frangible but I wouldn't want that and three others like it in the middle of the runway on landing! :lol:

Unless someone can provide me with evidence otherwise, I would say that they should go back out to the edge of the runway.

Thanks,

f
 
RC46 Anti aliasing still does mot work properly for me.
In the advance setup window, when in full screen mode, the anti aliasing tab is still grayed out.
But when in window mode it is editable.
Disregard post please. I figure it out.
I must select the Full Screen Window option and not the True Full Screen option.
 
Last edited:
Unless someone can provide me with evidence otherwise, I would say that they should go back out to the edge of the runway.

I'll add a configuration parameter in the runway lights section in a base configuration file for the PAPI lights.

edit: The default setting will be in a side of the runway.
 
Last edited:
PAPI

Shouldn't the PAPI be placed to coincide with the default Orbiter location, as outlined in the manual? The location is outlined quite clearly on page 99 (see image).

The visual approach aids at the SLF are designed for Shuttle landings. They include a Precision Approach Path Indicator (PAPI) for long-range glide slope alignment, and a Visual Approach Slope Indicator (VASI) for short-range alignment. The PAPI is setup for a glide slope of 20° (about 6 times as steep as standard aircraft approachslopes!). The VASI is set up for a 1.5° slope during the final flare up prior to touch-down
 

Attachments

  • OrbiterPAPI.png
    OrbiterPAPI.png
    71 KB · Views: 41
Shouldn't the PAPI be placed to coincide with the default Orbiter location, as outlined in the manual? The location is outlined quite clearly on page 99 (see image).
As flyer mentioned, that's STS specific, and doesn't mention where the lights are located. According to Wikipedia:
The PAPI is usually located on the left hand side of the runway at right angles to the runway centre line.
, but the image shows it to the right.

I like configurable. :cheers:
 
...but the image shows it to the right.

PAPIs can in fact be on the left, right or both sides of the runway...which can make it interesting when the left and right PAPIs are telling you different information!

My opinion (not that anyone asked for it :lol:) is that the configurable part should be either having PAPI lights on the left, right or both sides of the runway. As I said before I've never seen PAPIs located on the centreline of the runway.

:thumbup:

And just to clear something up:

As flyer mentioned, that's STS specific...

I was asking if having PAPIs located on the centreline was Shuttle specific, I don't think it is as I've never seen that configuration on any landing video. I don't think having PAPI lights ON the centreline is Shuttle specific, unless I am completely wrong.

Ahaaaaaaaaa!

I think having just read the previous posts properly...:facepalm:...the whole thing with the PAPIs being on the centreline is when they are located BEFORE the runway (2000m prior to the threshold as explained in the excerpt from the manual referenced above). So I guess there is a time when PAPIs would be on the EXTENDED centreline!!

The problem with doing this means that when the PAPIs are located as they are on most normal runways in real life that this doesn't work!

Maybe an extra configuration option of having Shuttle style PAPIs that are prior to the runway threshold which should then be on the centreline...

Apologies for my confusion!
 
Last edited:
There seems to be an issue with engine exhaust textures and their placement with regards to other vessels.

Here in this pic, I am firing the XR-2s main engines, and as you can see, the engine exhaust texture seems to go behind the solar panels...

I do not recall seeing this issue in pervious RCs.

picture.php
 
D3D9Client RC47

Here is RC47 for testing before the R1.

- Taxi lights are implemented
- Vessel force vectors are operational. (opacity/scale settings not implemented)
- Engine exhaust bug should be fixed
- PAPI configuration added

The default configuration for PAPI is a single light on a left side of the runway. A new parameter "PAPI2" allows more complex setups. The last two parameters are "x-displacement" and "mirror".

Here is an example that creates a three PAPI lights. Two on a both sides of the green line and one in a centerline about 2km befere the runway. Only one VASI can exist and 6 PAPIs per approach direction.

RUNWAYLIGHTS
END1 -8220 -3 -600
END2 -12670 -12 -3155
WIDTH 100
PAPI2 5.0 3.0 257 100 0
PAPI2 5.0 3.0 257 -100 1
PAPI2 20.0 3.0 -2000 0 0
VASI 1.5 152 671
TD_DISP 257
TD_LENGTH 1000
DECISION_DIST 300
APPROACH_START 1000
END
 
Last edited:
D3D9Client RC47

Here is a new build of RC47

- Runway lights width/style bug fixed
 
Last edited:
D3D9Client RC48

Here is one more RC before the R1. I had the debug controls partially implemented in RC44 so I desided to finish the implementation.

The debug controls is available from the Custom Functions and it contains controls for bounding geometry, mesh debugging/highlighting. It has also a special free Fly/Pan Camera mode that allows panning with LMB and can be moved forward/backwards with the wheel. A Proper implementation of panning would require some sort of pick algorithm to work. Currently camera pan sensitivity is controlled with a slider in the debug controls.

Are there any other known problems except:
- Black rectangles around some base objects usually mountains/hills ?
- Missing trains ans solar plants.
- Wheel brake force issue.
- Planetarium mode broken after restarting a scenario from launchpad. Due to broken GetCelestialMarkers()

The black rectangle is caused by missing "NoShadow" flag. It would take a few minutes to fix it from Martin's side and several days if I have to rewrite the entire base rendering from scratch. But the problem is that Martin is unlikely able to release a patch in next 1-2 years so what should we do ?

EDIT:
Would it be practical to restore the Orbiter 2010-P1 source codes on-to the development desktop and then provide a P2 based on those sources. What are the critical issues those should be patched ?
Any ideas what's the current status of Orbiter Beta and what's going on there ?

EDIT2:
Is there anyone willing to write some documentation for the D3D9Client ? Or is there anything that needs documentation ?
 
Last edited:
Just a small bug with the new debug controls.

Make sure your shutdown option is default. Load a scenario. In the Custom menu, you'll see the debug controls as an option. Exit the simulation (Orbiter should return to the launchpad). Reload a scenario. In the Custom menu, the debug controls aren't available anymore. You need to start a new instance of Orbiter in order to get it back.

Also, there is a small issue with the planet tile debugger. I can see some link between the "Highlight selected group" and the "Planet tile debugger" but the results are inconsistent.

Very nice debug window! I love the bounding boxes functionnality! :thumbup:
 
Documentation....I am really not to sure that is necessary. The one thing that seems to trip people up is the dynamic links. A readme first file that reminds people to create those links so to enable to use of multistage and spacecraft3 vessels is all I would recommend. The rest seem pretty self explanatory.

Then again I just remembered you included that new papi light stuff....
 
Make sure your shutdown option is default. Load a scenario. In the Custom menu, you'll see the debug controls as an option. Exit the simulation (Orbiter should return to the launchpad). Reload a scenario. In the Custom menu, the debug controls aren't available anymore. You need to start a new instance of Orbiter in order to get it back.
This one will be fixed.

Also, there is a small issue with the planet tile debugger. I can see some link between the "Highlight selected group" and the "Planet tile debugger" but the results are inconsistent.

I noticed that "Planet tile debugger" checkbox doesn't toggle the corresponding state flag. So, you need to toggle any other checkbox to update the status. I couldn't detect any other inconsistency there. This will be fixed.

---------- Post added at 23:12 ---------- Previous post was at 23:10 ----------

Documentation....I am really not to sure that is necessary. The one thing that seems to trip people up is the dynamic links. A readme first file that reminds people to create those links so to enable to use of multistage and spacecraft3 vessels is all I would recommend. The rest seem pretty self explanatory.

I suppose the client could remind the user about the links during the splash screen. Like it does remind about the GDI compatibility.
EDIT: Done. Just noticed that the Orbiter Sound is working without the link. So, the new version of 3.5 is online ?

Then again I just remembered you included that new papi light stuff....
There's a normal/specular/emission map stuff...
 
Last edited:
Back
Top