Soyuz 7K-TM

Graham2001

Well-known member
Joined
Mar 20, 2008
Messages
1,520
Reaction score
73
Points
48
Graham2001, the current structure can accommodate any version. It's all a mater of having the mesh and config file and defining the right jetting / dock placement.

Got everything I need downloaded. Will install tomorrow. If I had any graphics skill I'd give modeling a go...
 

diogom

Well-known member
Joined
Aug 2, 2010
Messages
1,372
Reaction score
415
Points
98
As for the parachute, the values are fictional. I based the parameters on the Shenzhou and Zond add-ons to get a stable reentry on the right orientation.
Please correct it and try to find a reference value for the actual landing velocity.

:cheers:
On these links you posted (once again thank you very much, that one from Google Books is excelent :thumbup:, and not easy to find), I found some good reference values for the landing.

When the main chute deploys, the spacecraft is slowed to ~6 m/s, and at 1.5m altitude, the soft landing engines fire, slowing it to 2-3 m/s. So the parachute, wich only slows it to ~20 m/s, needs a bit more of ''power''. I'l try to correct it.
 

4throck

Enthusiast !
Joined
Jun 19, 2008
Messages
3,502
Reaction score
1,008
Points
153
Location
Lisbon
Website
orbiterspaceport.blogspot.com
Finally got my head around the RCS!

This is my understanding of it:

The rotation thrusters (DO) are all at the back and are 8 of them in 4 pairs. This makes perfect sense.

All the other thrusters (14 total) are for translation. I've read that they can also do rotation but I'd say that would be uncommon or as a backup system.

Here's a config with approximate placements. I'm unsure about how many thrusters are used for up/down movement (3?) but I think it that this should be close to the actual config.


;--------- Main Engine Exhaust ----------

[EX_MAIN_0]
OFF=(0.0,0.0,-3.6)
DIR=(0.11,0.11,-0.988)
LENGTH=3
WIDTH=0.25


;----- Attitude Thrusters -----

[EX_ATT_0]
OFF = (-1.2, -0.0, -3.2) ; Yaw 1
DIR = (0, 3, 0)
LENGTH = .2
WIDTH = 0.04
ROT_AXIS = X
ROT_CW = 0 ; CW=1, CCW=0

[EX_ATT_1]
OFF = (1.2, -0.0, -3.2) ; Yaw 2
DIR = (0, 3, 0)
LENGTH = .2
WIDTH = 0.04
ROT_AXIS = X
ROT_CW = 0 ; CW=1, CCW=0

[EX_ATT_6]
OFF = (-1.2, -0.0, -3.2) ; Yaw 1
DIR = (0, -3, 0)
LENGTH = .2
WIDTH = 0.04
ROT_AXIS = X
ROT_CW = 1 ; CW=1, CCW=0

[EX_ATT_7]
OFF = (1.2, -0.0, -3.2) ; Yaw 2
DIR = (0, -3, 0)
LENGTH = .2
WIDTH = 0.04
ROT_AXIS = X
ROT_CW = 1 ; CW=1, CCW=0

;-----------------------------------------


[EX_ATT_2]
OFF = (0.86, 0.86, -3.2) ; Roll 1
DIR = (3, -3, 0)
LENGTH = .2
WIDTH = 0.04
ROT_AXIS = Z
ROT_CW = 1 ; CW=1, CCW=0

[EX_ATT_3]
OFF = (-0.86, -0.86, -3.2) ; Roll 2
DIR = (-3, 3, 0)
LENGTH = .2
WIDTH = 0.04
ROT_AXIS = Z
ROT_CW = 1 ; CW=1, CCW=0

[EX_ATT_10]
OFF = (-0.86, 0.86, -3.2) ; Roll 3
DIR = (-3, -3, 0)
LENGTH = .2
WIDTH = 0.04
ROT_AXIS = Z
ROT_CW = 0 ; CW=1, CCW=0

[EX_ATT_11]
OFF = (0.86, -0.86, -3.2) ; Roll 4
DIR = (3, 3, 0)
LENGTH = .2
WIDTH = 0.04
ROT_AXIS = Z
ROT_CW = 0 ; CW=1, CCW=0

;-----------------------------------------

[EX_ATT_4]
OFF = (0, -1.2, -3.2) ; Pitch 1
DIR = (-3, 0, 0)
LENGTH = 0.2
WIDTH = 0.06
ROT_AXIS = Y
ROT_CW = 0 ; CW=1, CCW=0

[EX_ATT_5]
OFF = (0, 1.2, -3.2) ; Pitch 2
DIR = (-3, 0, 0)
LENGTH = 0.2
WIDTH = 0.06
ROT_AXIS = Y
ROT_CW = 0 ; CW=1, CCW=0

[EX_ATT_8]
OFF = (0, -1.2, -3.2) ; Pitch 1
DIR = (3, 0, 0)
LENGTH = 0.2
WIDTH = 0.06
ROT_AXIS = Y
ROT_CW = 1 ; CW=1, CCW=0

[EX_ATT_9]
OFF = (0, 1.2, -3.2) ; Pitch 2
DIR = (3, 0, 0)
LENGTH = 0.2
WIDTH = 0.06
ROT_AXIS = Y
ROT_CW = 1 ; CW=1, CCW=0

;-----------------------------------------


;----- Translation Thrusters -----


[EX_ATT_18]
OFF = (0, -0.4271989, -3.5) ; main backup 1
DIR = (0, 0, -3.5)
LENGTH = 0.2
WIDTH = 0.06
LIN_AXIS = Z
LIN_CW = 1 ; CW=1, CCW=0

[EX_ATT_19]
OFF = (0, 0.4271989, -3.5) ; main backup 2
DIR = (0, 0, -3.5)
LENGTH = 0.2
WIDTH = 0.06
LIN_AXIS = Z
LIN_CW = 1 ; CW=1, CCW=0

[EX_ATT_20]
OFF = (0.4278386, -0.0, -3.5) ; main backup 3
DIR = (0, 0, -3.5)
LENGTH = .2
WIDTH = 0.04
LIN_AXIS = Z
LIN_CW = 1 ; CW=1, CCW=0

[EX_ATT_21]
OFF = (-0.4278386, -0.0, -3.5) ; main backup 4
DIR = (0, 0, -3.5)
LENGTH = .2
WIDTH = 0.04
LIN_AXIS = Z
LIN_CW = 1 ; CW=1, CCW=0

[EX_ATT_12]
OFF = (-1.2, -0.0, -0.77) ; retro 1
DIR = (-0.8, 0.0, 2.3)
LENGTH = .2
WIDTH = 0.04
LIN_AXIS = Z
LIN_CW = 0 ; CW=1, CCW=0

[EX_ATT_13]
OFF = (1.2, -0.0, -0.77) ; retro 2
DIR = (0.8, 0, 2.3)
LENGTH = .2
WIDTH = 0.04
LIN_AXIS = Z
LIN_CW = 0 ; CW=1, CCW=0

;-------------------------------------------------

[EX_ATT_16]
OFF = (0, -1.2, -2.93) ; down
DIR = (0.0, -3.5,0.0)
LENGTH = 0.2
WIDTH = 0.06
LIN_AXIS = Y
LIN_CW = 1 ; CW=1, CCW=0

[EX_ATT_17]
OFF = (0, 1.2, -2.93) ; up
DIR = (0.0, 3.5,0.0)
LENGTH = 0.2
WIDTH = 0.06
LIN_AXIS = Y
LIN_CW = 0 ; CW=1, CCW=0

[EX_ATT_22]
OFF = (0, -1.2, -1.2) ; down
DIR = (0.0, -3.5,0.0)
LENGTH = 0.2
WIDTH = 0.06
LIN_AXIS = Y
LIN_CW = 1 ; CW=1, CCW=0

[EX_ATT_23]
OFF = (0, 1.2, -1.2) ; up
DIR = (0.0, 3.5,0.0)
LENGTH = 0.2
WIDTH = 0.06
LIN_AXIS = Y
LIN_CW = 0 ; CW=1, CCW=0

[EX_ATT_24]
OFF = (0, -1.2, -1.11) ; down
DIR = (0.0, -3.5,0.0)
LENGTH = 0.2
WIDTH = 0.06
LIN_AXIS = Y
LIN_CW = 1 ; CW=1, CCW=0

[EX_ATT_25]
OFF = (0, 1.2, -1.11) ; up
DIR = (0.0, 3.5,0.0)
LENGTH = 0.2
WIDTH = 0.06
LIN_AXIS = Y
LIN_CW = 0 ; CW=1, CCW=0

;-------------------------------------------------

[EX_ATT_14]
OFF = (0.925, 0.875, -1.11) ; left
DIR = (3.5, 3.5, 0.0)
LENGTH = .2
WIDTH = 0.04
LIN_AXIS = X
LIN_CW = 0 ; CW=1, CCW=0

[EX_ATT_15]
OFF = (0.925, -0.875, -1.11) ; left
DIR = (-3.5, 3.5, 0.0)
LENGTH = .2
WIDTH = 0.04
LIN_AXIS = X
LIN_CW = 0 ; CW=1, CCW=0

[EX_ATT_26]
OFF = (-0.925, 0.875, -1.11) ; right
DIR = (-3.5, 3.5, 0.0)
LENGTH = .2
WIDTH = 0.04
LIN_AXIS = X
LIN_CW = 1 ; CW=1, CCW=0

[EX_ATT_27]
OFF = (-0.925, -0.875, -1.11) ; right
DIR = (-3.5, -3.5, 0.0)
LENGTH = .2
WIDTH = 0.04
LIN_AXIS = X
LIN_CW = 1 ; CW=1, CCW=0

;-------------------------------------------------


UPDATE: I've noticed that the translation axes are reversed ;-)

---------- Post added 01-18-11 at 02:36 PM ---------- Previous post was 01-17-11 at 10:21 PM ----------

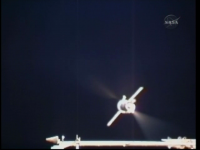
Here's a video that shows a Progress docking with the jets clearly visible.
Although it isn't the same craft, I think we can try to adjust the size and general look by it.

[ame="http://www.youtube.com/watch?v=nECtO9R-b-Y"]YouTube - Progress m-66 docking 1[/ame]
 
Last edited:

diogom

Well-known member
Joined
Aug 2, 2010
Messages
1,372
Reaction score
415
Points
98
These are the "unreversed" thrusters, I know how much annoying it is when they get reversed. :lol:

;----- Translation Thrusters -----

[EX_ATT_18]
OFF = (0, -0.4271989, -3.5) ; main backup 1
DIR = (0, 0, -3.5)
LENGTH = 0.2
WIDTH = 0.06
LIN_AXIS = Z
LIN_CW = 0 ; CW=1, CCW=0

[EX_ATT_19]
OFF = (0, 0.4271989, -3.5) ; main backup 2
DIR = (0, 0, -3.5)
LENGTH = 0.2
WIDTH = 0.06
LIN_AXIS = Z
LIN_CW = 0 ; CW=1, CCW=0

[EX_ATT_20]
OFF = (0.4278386, -0.0, -3.5) ; main backup 3
DIR = (0, 0, -3.5)
LENGTH = .2
WIDTH = 0.04
LIN_AXIS = Z
LIN_CW = 0 ; CW=1, CCW=0

[EX_ATT_21]
OFF = (-0.4278386, -0.0, -3.5) ; main backup 4
DIR = (0, 0, -3.5)
LENGTH = .2
WIDTH = 0.04
LIN_AXIS = Z
LIN_CW = 0 ; CW=1, CCW=0

[EX_ATT_12]
OFF = (-1.2, -0.0, -0.77) ; retro 1
DIR = (-0.8, 0.0, 2.3)
LENGTH = .2
WIDTH = 0.04
LIN_AXIS = Z
LIN_CW = 1 ; CW=1, CCW=0

[EX_ATT_13]
OFF = (1.2, -0.0, -0.77) ; retro 2
DIR = (0.8, 0, 2.3)
LENGTH = .2
WIDTH = 0.04
LIN_AXIS = Z
LIN_CW = 1 ; CW=1, CCW=0

;-------------------------------------------------

[EX_ATT_16]
OFF = (0, -1.2, -2.93) ; down
DIR = (0.0, -3.5,0.0)
LENGTH = 0.2
WIDTH = 0.06
LIN_AXIS = Y
LIN_CW = 0 ; CW=1, CCW=0

[EX_ATT_17]
OFF = (0, 1.2, -2.93) ; up
DIR = (0.0, 3.5,0.0)
LENGTH = 0.2
WIDTH = 0.06
LIN_AXIS = Y
LIN_CW = 1 ; CW=1, CCW=0

[EX_ATT_22]
OFF = (0, -1.2, -1.2) ; down
DIR = (0.0, -3.5,0.0)
LENGTH = 0.2
WIDTH = 0.06
LIN_AXIS = Y
LIN_CW = 0 ; CW=1, CCW=0

[EX_ATT_23]
OFF = (0, 1.2, -1.2) ; up
DIR = (0.0, 3.5,0.0)
LENGTH = 0.2
WIDTH = 0.06
LIN_AXIS = Y
LIN_CW = 1 ; CW=1, CCW=0

[EX_ATT_24]
OFF = (0, -1.2, -1.11) ; down
DIR = (0.0, -3.5,0.0)
LENGTH = 0.2
WIDTH = 0.06
LIN_AXIS = Y
LIN_CW = 0 ; CW=1, CCW=0

[EX_ATT_25]
OFF = (0, 1.2, -1.11) ; up
DIR = (0.0, 3.5,0.0)
LENGTH = 0.2
WIDTH = 0.06
LIN_AXIS = Y
LIN_CW = 1 ; CW=1, CCW=0

;-------------------------------------------------

[EX_ATT_14]
OFF = (0.925, 0.875, -1.11) ; left
DIR = (3.5, 3.5, 0.0)
LENGTH = .2
WIDTH = 0.04
LIN_AXIS = X
LIN_CW = 1 ; CW=1, CCW=0

[EX_ATT_15]
OFF = (0.925, -0.875, -1.11) ; left
DIR = (3.5, -3.5, 0.0)
LENGTH = .2
WIDTH = 0.04
LIN_AXIS = X
LIN_CW = 1 ; CW=1, CCW=0

[EX_ATT_26]
OFF = (-0.925, 0.875, -1.11) ; right
DIR = (-3.5, 3.5, 0.0)
LENGTH = .2
WIDTH = 0.04
LIN_AXIS = X
LIN_CW = 0 ; CW=1, CCW=0

[EX_ATT_27]
OFF = (-0.925, -0.875, -1.11) ; right
DIR = (-3.5, -3.5, 0.0)
LENGTH = .2
WIDTH = 0.04
LIN_AXIS = X
LIN_CW = 0 ; CW=1, CCW=0

;-------------------------------------------------


So, RCS jets done, old fairing done, what's next? :)
 

4throck

Enthusiast !
Joined
Jun 19, 2008
Messages
3,502
Reaction score
1,008
Points
153
Location
Lisbon
Website
orbiterspaceport.blogspot.com
I'm still working on those jets! They need to be about 10x larger but very transparent / soft in appearance. A custom texture will do ;)

Next... well, get that parachute to slow you down to the right speed :) , and improve the basic solar panel animations.
Another nice touch would be to add custom sound. I don't know if there's some suitable material (video?) and my Russian is zero, but if someone could find something, that would be nice :)
 
Last edited:

diogom

Well-known member
Joined
Aug 2, 2010
Messages
1,372
Reaction score
415
Points
98
When I said ''RCS done'', I meant the basic, of course it still needs some work. Anyway, I found a texture that could help for the RCS jets. It's an Orbiter original texture, Horizon.dds, at it's similar to these jets seen on the Progress video :thumbup:. Maybe with some editing, it could work.
The parachute I think I can handle, but the solar panels... well, I kinda think it's still a bit complicated for my level of addon creation learning. :lol:
On the sound, I will make some research for some sources. My Russian is not zero, but it's not much better than that :lol:, although the basic I think I can understand.

EDIT: Also, maybe the Shuttle's RCS would work too, with some editing.
 

Attachments

  • horizon.bak.jpg
    horizon.bak.jpg
    469 bytes · Views: 241
Last edited:

diogom

Well-known member
Joined
Aug 2, 2010
Messages
1,372
Reaction score
415
Points
98
I found this website, contains several sounds recorded in Sweden, with sounds of many Russian/Soviet spacecraft. I will look for more.

http://www.svengrahn.pp.se/sounds/sounds.htm

ASTP video documentary, has some sounds, and good video.

 
Last edited:

4throck

Enthusiast !
Joined
Jun 19, 2008
Messages
3,502
Reaction score
1,008
Points
153
Location
Lisbon
Website
orbiterspaceport.blogspot.com
Nice sound suggestions and cool video (ASTP is perhaps the basis of the ISS (both in concept - international cooperation - and hardware - universal docking port), so it's always cool and relevant).

I'm trying something like this for RCS:
110120223847tpaoservice.jpg


Not 100% realistic but close to the video reference.

As for animations, what really needs to be done is identify the right mesh group order.
As it is, all the groups are already listed are scaled together.
To do an "accordion" like unfolding those groups must be animated individually. So it's just a matter of finding the right number sequence. MeshWizard is helpful here ;)
The actual movements (how much to rotate and what direction) can be figured out latter :)
 
Last edited:

diogom

Well-known member
Joined
Aug 2, 2010
Messages
1,372
Reaction score
415
Points
98
RCS looks good. IMO, it only needs to be a little bit longer.
There are also some good sounds on Race Into Space, found on it's directory, like russian launch cowntdowns. It's just a shame the Soviets kept everything under that secrecy, if they hadn't, today we could have more audio from the Soyuz. There is a russian soundpack in Dan's website, it should have good material.
 

DaveS

Addon Developer
Addon Developer
Donator
Beta Tester
Joined
Feb 4, 2008
Messages
9,435
Reaction score
689
Points
203
RCS looks good. IMO, it only needs to be a little bit longer.
Try about 3x longer. This is a screengrab I have of the Soyuz firing its RCS thrusters:
 

Attachments

  • NASATV_01178.png
    NASATV_01178.png
    185.2 KB · Views: 50

diogom

Well-known member
Joined
Aug 2, 2010
Messages
1,372
Reaction score
415
Points
98
Nice work on the jets! :thumbup:

I have modified the landing thrusters' position on the SA to match the actual thrusters' position on the texture.

4throck, the parachute drag on your last update was better, but it still gave a pretty rough landing, so I also increased the drag for the parachute, for the speed to be more accurate with historical sources (slowed to ~6 m/s at 5.5km altitude).

Deploy chute at 10km altitude. It takes a long time to get to the ground, but you can also release it at the less realistic altitude of 5.5km :p.
 

Attachments

  • Soyuz 7k_updated landthrusters_chute.zip
    3.7 KB · Views: 11

4throck

Enthusiast !
Joined
Jun 19, 2008
Messages
3,502
Reaction score
1,008
Points
153
Location
Lisbon
Website
orbiterspaceport.blogspot.com
Thanks! I'll update the SA configs with your improvements.

One thing that needs to be done is documentation. Nothing complicated, just the normal keys to press and mission sequence (like when to use release the parachutes :) ). Something to get a novice going.

I've also got permission to use a this high-resolution 360º photo for the VC! :hailprobe:

Credits go to Istvan Takacs, so he will be mentioned on the docs.
I will keep my panel though, because it's already integrated with Orbiter's MFDs. But that image will cover the rest of the cockpit with great detail!
 

diogom

Well-known member
Joined
Aug 2, 2010
Messages
1,372
Reaction score
415
Points
98
Ok, I can do the documentation. Just tell me if I'm leaving someone out of the credit list:

Meshes by castorp
VC by 4throck
Config files for the spacecrafts by 4throck & diogom
Textures by 4throck , castorp & diogom
Scenarios by 4throck

Also, thanks to Istvan Takacs, for his permission to use Soyuz VC images; Everyone who posted on the Orbiter Forum's Soyuz 7k thread, who helped on its development: Urwumpe & Wishbone (translating from Russian to English info for the VC); jedimaster1214 (some help with configs); DaveS (some help with the RCS jets).

Let me know if there is someone out that should be here (it's very likely I forgot someone), I will begin work on the doc.
 

diogom

Well-known member
Joined
Aug 2, 2010
Messages
1,372
Reaction score
415
Points
98
The documentation is done! I think it's enough to ''get a novice going''. :lol:

Also, I think you forgot to include in the last Soyuz update the CCCP flag texture.:tiphat:


:hailprobe:
 

Attachments

  • Soyuz 7k Documentation.zip
    1.2 MB · Views: 34

castorp

Member
Joined
Apr 15, 2008
Messages
70
Reaction score
1
Points
6
Location
London, UK
I've also got permission to use a this high-resolution 360º photo for the VC! :hailprobe:

very cool beans!
'lot of neat stuff happening here.
'still haven't made much further progress with the -tm mesh (bloody real life!), but will get it done one of these (tues)days!

cheers
hc
 

4throck

Enthusiast !
Joined
Jun 19, 2008
Messages
3,502
Reaction score
1,008
Points
153
Location
Lisbon
Website
orbiterspaceport.blogspot.com
Same here, "RealLife Simulator" is taking my Orbiter time :)

I'm having a little trouble in changing the VC textures, as the point of view is not the same. Therefore, the MFD mesh groups and viewports don't match. Not very hard to change, but it will take some time. Also, that cockpit panorama has the exit hatch open, with the cover on one of the seats. I'll need to edit it to the correct flight configuration.

Yes, perhaps next Tuesday I'll have it done :lol:! But it's moving along in a relaxed way and with contribution from a lot of people. Exactly what I had in mind in the first place: free form open contribution from all.
 
Last edited:

4throck

Enthusiast !
Joined
Jun 19, 2008
Messages
3,502
Reaction score
1,008
Points
153
Location
Lisbon
Website
orbiterspaceport.blogspot.com
Here's an updated version with the new cockpit textures!
It's not possible to keep my original panel, so the integration of the MFDs is not so good. This has to do with image projection (360º) and the way I hadle it in the VC mesh (just a cube :) ).
On the overall I think that the effect is better this way, but there's room for improvement.
Anyway, I feel this is getting close to a OH release.

http://download1172.mediafire.com/b5racaaqlnig/h6bkqjmr3llxb7h/7k_orbiter.rar
 

diogom

Well-known member
Joined
Aug 2, 2010
Messages
1,372
Reaction score
415
Points
98
Nice work on the VC! :thumbup: This is definitly getting close to a O-H release. What's the next thing in the "to-do list"?

BTW, thanks for including my documentation :tiphat:, and castorp, thanks for your progress on the -tm mesh. If only one could press Ctrl+Q on the "RealLife Simulator" for a while... exams getting close, here =(
 

diogom

Well-known member
Joined
Aug 2, 2010
Messages
1,372
Reaction score
415
Points
98
Some screenshots I took of Soyuz 34's trip to Salyut 6.
 

Attachments

  • Soyuz 13 launch.jpg
    Soyuz 13 launch.jpg
    4.8 KB · Views: 57
  • over South America.jpg
    over South America.jpg
    11.5 KB · Views: 52
  • Window view.jpg
    Window view.jpg
    11.3 KB · Views: 73
  • Salyut window view.jpg
    Salyut window view.jpg
    12.3 KB · Views: 76
  • almost there.jpg
    almost there.jpg
    7.6 KB · Views: 64
Top