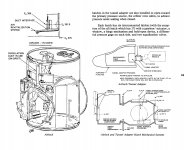
The reason why I moved them was that they created a too long extension, protruding into Bay 1 and the Xo582 ring frame. According to the attached schematic from the Rockwell Intl. Media Resource Kit for STS-9, the lower section of the forward bulkhead is at Xo576. This of course agrees very nicely with the PLBD and Radiator Panel Familiarization Manual which has the doors starting at Xo576.3 and ending at Xo574.09. Even if I move the entire bulkhead mesh so that the bottom is at Xo576.3(Z=9.6086), the top is at Xo571.5(Z=9.7229). That is 2.59 inches or 0.065786 m off. So something has to change here, in my opinion it is the mesh.
Effectively, the "bulkhead" that we see is just blankets, except for the margin on the top half (part of the upper forward fuselage structure), which has the forward tilt. The crew module Xo576 wall is the only (metal) bulkhead there, and it being vertical means the gap between it and the "tilted margin" decreases as we move up, unlike that (simplified) diagram, and most others.
When I positioned the bulkhead (especially the bottom half), I chose not to "sink in" the lower end, because "how much should it go in?", and "how does that then meet the top half?". It creates some issues, the obvious ones are the forward-most PLB ring being half-buried, as well as the a tunnel/TAA attaching to the hatch opening, but there is really no good way of doing this without making a mesh group with a grid of points and fiddling with it until it has the shape of the blankets... maybe not a priority when big things don't fit each other, there visible gaps here and there, pad FPS performance isn't that great, etc... :shrug:
Long story short: the outside bulkhead shape at the top, and the fwd end of the PLBDs, should be good as I left it, the inside/middle area and bottom half are a bit aft as I didn't model the blankets, which sink forward, bridging the gap to the Xo576 bulkhead.
Also, I didn't make the corners of the PLBDs curved, as it was too much work for little gain. Otherwise, I think it was all squared away in terms of structure at the fwd end.
---------- Post added at 07:41 PM ---------- Previous post was at 07:27 PM ----------
On my end: ended up remaking the TAA structure, at there was no way to correct the oval hatch opening to the correct round shape. :facepalm:
The "standard parts": basic hatch, hatch frame and the ring to connect the tunnels/AL/TAA/whatever are pretty much done, and I'm now copying the hatch-mouted parts, from the only round hatch we have to the new hatch, as those parts are usable.
")