- Joined
- May 14, 2008
- Messages
- 10,547
- Reaction score
- 347
- Points
- 158
- Location
- East Sussex
- Website
- blog.gdwnet.com
- Preferred Pronouns
- He/Him
As a lot of people seem to have summer projects to build a PC and have lots of questions around I thought I'd put together a quick quide to building a PC as I've had requests to build a few.
Just to add - I have done this many, many times. If you are in doubt seek expert assistance. PC's use power and so can cause an eletric shock, they are also not cheap when processors fry so if you follow this guide you do so at your own risk!
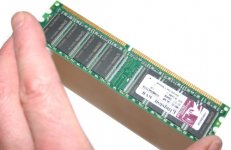
The PC I'm building for this little tutorial is an Intel i3 PC. The set is part of a bundle that comes with motherboard, processor and RAM. Graphics are onboard. The case I'm using is an older one that I've removed the existing motherboard from.
If you have any questions as I go through things then please ask! The tutorial will be in several parts.
Part One - The tools:
First thing you need is a nice clear space where you can put things without having them moved by people or cats. Also somewhere that you have plenty of light and somewhere CLEAN. I can't empahsis that enough. Whatever workspace you pick must be clean otherwise you'll lose parts and thats the most frustrating part of a build.
You'll also need a screwdriver and some screws. I favour an electric screwdriver for the most part:

As I said above, the case I am using is an older one that I've cleared out. I've also got a light strip that helps provide a lot of artificial light which really helps when working on the more fiddly elements:

So, you've got a case, light and a screwdriver. You are now ready to build a PC. :lol:
Part Two: The Power Supply & Back template
There are many schools of thought around power supplies. The simple answer is 'get one that has more power than you need but not so much power that it costs more than it needs to'. Remember that the quoted wattage on a PSU is best case scenario. In reality you'll never get that so always shave 50watts off quoted specs and you'll give yourself a decent margin. There are various online tools for working out what you'll need.
Now this PC I'm building won't be used for games hence the onboard graphics rather than a third party graphics card. The PSU will need to power the motherboard, the CPU and fans and some hard drives so it doesn't need to be huge. My local maplin were doing a deal so I got a 680Watt PSU. That is more than enough for this machine.

Unbox the power supply and slot it into the case - make sure all the fans point OUTWARD.

Next just screw it into the case. You'll probably need four screws:

Done, nice and easy. At this point I plug in the power but do NOT turn it on. As the power lead has an EARTH connection it just helps to make sure that I'm not going to cause any damage due to ESD.
Now, one of the fiddly bits - the back template. This is just a small aluminum back piece that allows all the connections to face outward and prevents gaps from allowing dust in. You don't have to install it but it looks neat and as I said it stops dust from getting it. In the box it will look like this:

Remove it from the wrapping and snap it into place. It might need a little bit of force and make sure it's the right way up!!

Part Three - The Motherboard
Installing the motherboard is easy. It just pops into the case as is screwed into place. Make sure you are earthed when you do it. You might find that there is some resistance from the back template so just be careful with that and push it into place.

Just to add - I have done this many, many times. If you are in doubt seek expert assistance. PC's use power and so can cause an eletric shock, they are also not cheap when processors fry so if you follow this guide you do so at your own risk!
The PC I'm building for this little tutorial is an Intel i3 PC. The set is part of a bundle that comes with motherboard, processor and RAM. Graphics are onboard. The case I'm using is an older one that I've removed the existing motherboard from.
If you have any questions as I go through things then please ask! The tutorial will be in several parts.
Part One - The tools:
First thing you need is a nice clear space where you can put things without having them moved by people or cats. Also somewhere that you have plenty of light and somewhere CLEAN. I can't empahsis that enough. Whatever workspace you pick must be clean otherwise you'll lose parts and thats the most frustrating part of a build.
You'll also need a screwdriver and some screws. I favour an electric screwdriver for the most part:
As I said above, the case I am using is an older one that I've cleared out. I've also got a light strip that helps provide a lot of artificial light which really helps when working on the more fiddly elements:
So, you've got a case, light and a screwdriver. You are now ready to build a PC. :lol:
Part Two: The Power Supply & Back template
There are many schools of thought around power supplies. The simple answer is 'get one that has more power than you need but not so much power that it costs more than it needs to'. Remember that the quoted wattage on a PSU is best case scenario. In reality you'll never get that so always shave 50watts off quoted specs and you'll give yourself a decent margin. There are various online tools for working out what you'll need.
Now this PC I'm building won't be used for games hence the onboard graphics rather than a third party graphics card. The PSU will need to power the motherboard, the CPU and fans and some hard drives so it doesn't need to be huge. My local maplin were doing a deal so I got a 680Watt PSU. That is more than enough for this machine.
Unbox the power supply and slot it into the case - make sure all the fans point OUTWARD.
Next just screw it into the case. You'll probably need four screws:
Done, nice and easy. At this point I plug in the power but do NOT turn it on. As the power lead has an EARTH connection it just helps to make sure that I'm not going to cause any damage due to ESD.
Now, one of the fiddly bits - the back template. This is just a small aluminum back piece that allows all the connections to face outward and prevents gaps from allowing dust in. You don't have to install it but it looks neat and as I said it stops dust from getting it. In the box it will look like this:
Remove it from the wrapping and snap it into place. It might need a little bit of force and make sure it's the right way up!!
Part Three - The Motherboard
Installing the motherboard is easy. It just pops into the case as is screwed into place. Make sure you are earthed when you do it. You might find that there is some resistance from the back template so just be careful with that and push it into place.


")
 moment is quite recognizable. You can take definitive action clearly and concisely. But with subtle static damage the problem creeps in on you slowly. You may not observe anything other then that there are unexplained CTD's happening or similar "strange" things going on at random intervals.