Request Visual terrain editor

Seems like Tileedit for whatever reason doesn't like the *.png exported by Paint.NET. I've tried every combination in the Paint.NET PNG export dialog and nothing will make it play nice with Tileedit. So in the end I'm not sure if this is Tileedit problem or a Paint.NET problem.
And now where back to the same issue, even with the image exported from GIMP with the exact same settings that made it work the first time. Right now, I'm leaning hard towards that there's some kind bug with Tileedit, maybe it's OS specific? Seen things like that before, where a difference in the OS made it work in an earlier version but not a later one. So could the problem come from the fact that I'm running Win 11 and Tileedit was most likely built on an Win 10 machine?

So, unless Tileedit gets some bug fixes, we're back to my original subject and request.
 
Last edited:
I edited a PNG in Photoshop and just saved it without any options. And I see the elevation changes in game (with the reservations that I mentioned above). I used Windows 10.
 
I see my changes when the 16 level is currently rendered, but they dissapear if I get a little bit closer and the 17 level is rendered:

16.png
17.png
@dgatsoulis, do you have such a problem in your method (if you extract ELV tiles from the TREE format)?
 
I edited a PNG in Photoshop and just saved it without any options. And I see the elevation changes in game (with the reservations that I mentioned above). I used Windows 10.
I am also on a Windows 10 machine, so I guess that's the problem. Definitely not worth for one to revert to Win10 just for this. Working on a visual representation of the RECT and ELLIPSE while Orbiter is running. Should have a test version in a couple of hours.

1720080679267.png
 
@dgatsoulis, do you have such a problem in your method (if you extract ELV tiles from the TREE format)?
If I understand correctly, you edited the level 16 tile, but a level 17 tile exists, correct?
If you didn't change the tile at the resolution you are viewing, then you won't see any changes at that resolution. You need to make the changes at the highest level for which an elv tile exists and then propagate them backwards. At least that's what I've been doing.
 
If I understand correctly, you edited the level 16 tile, but a level 17 tile exists, correct?
No, I edited an elevation tile of the level 13, whereas the level 14 didn't exist. And I haven't the ELV tile of any level, because I haven't extracted it from archive yet.
 
It looks like a FLT file doesn't work in the middle of the ocean where elevation is zero. Could someone try this, for example?:
Code:
ELLIPSE 500 -132 -35 500 500 0 10
But it works with other coordinates. For Cape Canaveral:
Code:
ELLIPSE 500 -80.6875 28.6044 500 500 0 10
 
----------------EDIT------------------
This version of the flattening tool has been removed.
You can find the latest version in its own thread here.
----------------------------------------


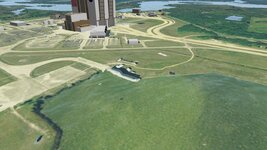
Ok, since many have reported difficulties with tileEdit, I made a tool that you can use within Orbiter and set flat areas. (Either Rect or Ellipse)
This is a request that goes in hand with what I have posted previously in this thread: https://www.orbiter-forum.com/threads/flat-cape-canaveral-area.41771/
This editor would take the guessing out of getting flat/elevated areas. Right now, using the D3D9Client *.flt files, it's a pure guessing game of trial&error to see where you are actually editing the the terrain. It would work in tandem with the actual planetary textures so you could see the terrain you're editing.

Take the guessing out? Check.
See where you are actually editing? Check.
Works in tandem with the actual planetary textures? Check.

Here is a quick video demonstration:


Instructions:

1. Prerequisites:
You will need the extended LuaScript by @kuddel .
Get the file "LuaScriptPlus DLLs (for Orbiter 2016).zip" from the attachments in the link below and unzip them in you Orbiter root directory:

2.Unzip the file attached on this post and everything will go in its place.

Usage:
- 1st Step (VERY IMPORTANT!) : Make sure that you have created a folder named Flat, in the Textures\(Name of body)\ folder of the body that you will flatten the area.
1720101087205.png
- In the Visual effects tab, make sure that Surface elevation using "Linear interpolation" is checked.
1720102756796.png
- In the modules tab, make sure that you have checked the LuaConsole
1720101568998.png
  • Run any scenario and open the Scenario Editor.
  • Press New
  • Name the vessel however you want and select from the dropdown list: "Rect" if you want to flatten a rectangular area of "Ellipse" if you want an elliptical one.
  • Make SURE that you have checked both Set camera and Set input focus and press "Create"

1720101442687.png
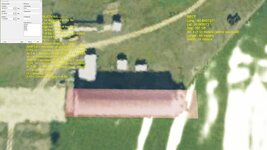
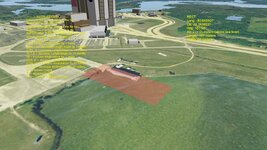
-Press "Location" and place the created vessel near the coordinates that you wish to flatten.
-Select Function from the top bar-menu (or press Ctrl-F4) and select Lua Console.
-In the Lua Console window type: run("flat")
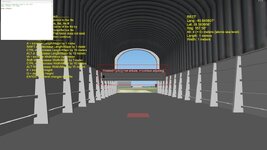
-The Script will run and you will see instructions on screen about the keys and the flat area information.
-Watch the video to see a demonstration.

Notes:
In the beginning the tool has a size of only 1 meter. You will press the keys needed to adjust its size (shown on screen).
The actual flattening depends on the resolution of the elev tiles that are available in the area. Don't try to draw rectangles that are exactly the size of a runway, because most probably the elev tiles that you have won't support it. So unless you know what you are doing, it's best to draw a bigger area than the one you actually want to flatten.

The line with the information for the flattening gets appended (written at the end) of a file named "My_flat_file.flt" located in the Textures\((Name of body)\Flat folder.
(you can change the name of the file if you want by editing Line 2 in the Script\flat.lua file. You can even enter an existing .flt file. It will simply add a line at its end.)
In the Line 3 of the lua script, you can edit the falloff value. (default = 5, explanation in the same line of the lua file).

Give it a shot and let me know if it works for you.
 
Last edited:
How do you get rid of this window:
 

Attachments

  • LuaFlat_window.jpg
    LuaFlat_window.jpg
    78.6 KB · Views: 7
The lua console window you can simply close. the popup window type y or n and press enter.
Hmmm... now that I think about it Enter is also the key that ends the adjustment part of the script. So that might be causing a bug.
Fix comming up.


EDIT: I have updated the zip file in post #29
Instead of ENTER to commit the adjustment, you now need to press F12. Help Text on the left of the screen has been updated.

Only the Script\flat.lua file was changed.

Changes:
Line 220 keyPressed_end = keypress(13) --Enter changed to keyPressed_end = keypress(123) --F12
Line 301 help_msg18 = "\nENTER = Commit changes to flt file" changed to help_msg18 = "\nF12 = Commit changes to flt file"

Thanks for testing.
 
Last edited:
The lua console window you can simply close. the popup window type y or n and press enter.
Hmmm... now that I think about it Enter is also the key that ends the adjustment part of the script. So that might be causing a bug.
Fix comming up.


EDIT: I have updated the zip file in post #29
Instead of ENTER to commit the adjustment, you now need to press F12. Help Text on the left of the screen has been updated.

Only the Script\flat.lua file was changed.

Changes:
Line 220 keyPressed_end = keypress(13) --Enter changed to keyPressed_end = keypress(123) --F12
Line 301 help_msg18 = "\nENTER = Commit changes to flt file" changed to help_msg18 = "\nF12 = Commit changes to flt file"

Thanks for testing.
The updated version fixed issue with the dialog box not going away and editing seems to work.
 
Big issue: First screenshot shows the desired and set settings while the second screenshot shows what I get after a reload. Nothing alike.
 

Attachments

  • LuaFlat_desired.jpg
    LuaFlat_desired.jpg
    75.9 KB · Views: 3
  • LuaFlat_actual.jpg
    LuaFlat_actual.jpg
    62.2 KB · Views: 3
Big issue: First screenshot shows the desired and set settings while the second screenshot shows what I get after a reload. Nothing alike.
Seems as if something is wrong with the calculation of the rotation. Lua returns a heading in radians, with a range of 0 to 2π, with 0 being north and π being south. The flt file needs that "translated" to degrees, but with 0 degrees being parallel to the equator.

Please share the line that was appended to the flt file so I can have a look. (assuming that you committed when the heading was 167.56°).
This is the line directly from the KSC.flt file:
Code:
RECT 0 -80.645737 28.583973 85 18 -77.56 5
 
My calculation also returns -77.56 which seems correct. Heading 167.56 is 12.44° away from the south direction of 180°. -77.56 is -12.44 away from -90 which is south according the the flt file's requirements. (0 east, 90 north).

What seems to be the culprit here is the size: 85 18
it seems that the area that you are flattening is too small for the existing elevation tiles.

That's why I mention in the notes:
The actual flattening depends on the resolution of the elev tiles that are available in the area. Don't try to draw rectangles that are exactly the size of a runway, because most probably the elev tiles that you have won't support it. So unless you know what you are doing, it's best to draw a bigger area than the one you actually want to flatten.

Let me explain a bit more.
Even at the highest available elevation resolution (which is level 17, assuming you have the high resolution elev tiles) one pixel has a resolution of ~ 9 meters. (~ 9.5 meters vertical and ~8.5 meters horizontal at the latitude you are editing).
So flattening an area with a width of less than 2 pixels at the highest available resolution, will not be feasible. You'll have to be completely zoomed in to (maybe?) see a flattening of two elev pixels and if you zoom a liitle bit out you get to the previous level (16) which has 1/2 the previous resolution (about 20 meters per pixel).

In my opinion, unless you have some custom made level 19 elev tiles for the area that you are editing, don't go below 40 meters in either width and length (and that is assuming that you have level 17 elev tiles to support it).

So it seems that it is not a bug from the tool but a limitation of the available elevation tiles.
Just to check, make a rectangle 80 x 40 (ish) meters at the same location. and see the result. I want to make sure that the rotation calculation is done properly.


EDIT: Nope, turns out it was a bug and the length/width values needed to be swapped. (Thanks DaveS!)
 
Last edited:
Here you go, not much of difference:
RECT 0 -80.645507 28.583823 167 64 -77.56 1
Looking at things, it almost looks like the rotation is a perfect 90°s off.
 

Attachments

  • LuaFlat_desired2.jpg
    LuaFlat_desired2.jpg
    127.1 KB · Views: 2
  • LuaFlat_actual2.jpg
    LuaFlat_actual2.jpg
    113 KB · Views: 2
Here you go, not much of difference:
RECT 0 -80.645507 28.583823 167 64 -77.56 1
Looking at things, it almost looks like the rotation is a perfect 90°s off.
Thanks for testing! Yes it does seem like that, or perhaps the length and width values need to be swapped before writing do the flt file. I'll look a bit more into it and get back with a fix. For now, try swapping the values in the flt file: 167 64 to 64 167
 
Swapping the width/height around solved the issue, things now looks like they're supposed to.
 

Attachments

  • LuaFlat_solved.jpg
    LuaFlat_solved.jpg
    112.9 KB · Views: 3
Ok, I swapped the values and everything seems to be ok now (hopefully). Zip file on post #29 had been updated.

I think I need to add a few more keys (probably the arrows next to the numpad), to change the object's rotation and position. It's ok to use the scenario editor for the initial position but making minor adjustments with it becomes annoying.
I am thinking left-right will change the longitude by some small value, forward-back to change the latitude and Shift-left, Shift-right to change the heading.
 
Last edited:
Back
Top