At the end of the very first post in this thread I had that noted already.
The previous stage is old-style textures. This is how Orbiter2010 bases worked. The method kind of works in 2016 as well, but it shows visual artifacts if you also have terrain showing (looks like the textured sphere plane shines through the terrain). After the treeman-dance, you have the texture incorporate "properly" in the texture tree, i.e. you have 2016 base definition. However, the old surface tile list in the configuration will cause Orbiter to show both representations, possibly leading to visual artifacts, therefore I always recommend to remove those lines after conversion. This has nothing to do with cache/archive precedence.
Hi again, I had few minutes to try and I would say I'm having good progresses. So far I tried only with 1 tile because of lack of time and just to see if it was working and yes, it works.
I got the hig-res texture using SASPlanet with precise coordinates for the tile taken from tileedit2 so to obtain precisely 512x512 PNG files.
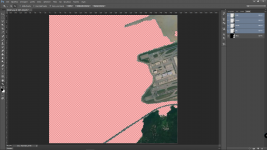
I used photoshop to add a mask, this time in the correct way, I actually deleted the water making it transparent. Saved the new PNG file.
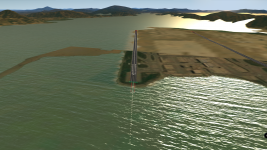
I used Orbiter Base Maker to place better the runways using the PNG file just edited with mask included as background for a zoom level 4.
This automatically exported the PNG with the name Earth_4_......DDS in Textures2 and added to the .cfg file the code. I changed there 1 in to 3 as suggested.
I used the -b command to get the folder structure for the Surd and for the Mask in the Texture\Earth and it also exported the .DDS file with corrected name.
I removed the code in the .cfg file.
I didn't use -i yet because I just wanted to see if this was working.
Now I've one more question. When I used the treeman and I created the Mask folder the .DDS file used for the tile has been automatically recognized having a mask and I can see it in the Mask folder in black and white which is ok but the problem is that it overlapped with the original night light mask, practically I can see a fusion of the new water mask with old night light mask. How can I avoid this? And after avoiding this to make a night light mask what should I do? May be I've the answer but not sure... When I added a new Channel in photoshop (see picture) and made the mask, on the channel window there where also other levels, there is the RGB level, should I edit that one for the light with white or yellow colors? or more simply apply some real night light picture?
Thank you for all the tips, I'm having results