Vessel Commerical LEO destinations and other space stations

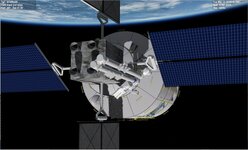
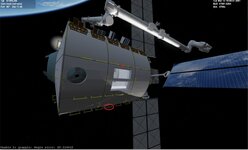
I think they need to be defined as both CHILD and PARENT attachments since most likely the arm must move anywhere the station like the Canadarm2 is doing at the ISS
 
Look at the Canadarm2 manual.
 
So As I understand it.

the Starlab is a single unit. the solar panels,... are one unit.
So really the attachments need to be parents to allow the SSRMSD to move.

I will make the science airlocks parent attachments. And add code for them to grab things.

On the aft section there are 8 attachments. I will attachment points to them as parents.

Then for a launch the arm will be folded.


So we get this. I think my rms target are too small? You could not see the target

I need to find a scenario where the RMS is folded at start
 

Attachments

  • STARLABATTACHMENTS1.jpg
    STARLABATTACHMENTS1.jpg
    87.1 KB · Views: 10
  • STARLABATTACHMENTS2.jpg
    STARLABATTACHMENTS2.jpg
    84.3 KB · Views: 11
  • starlabattachments3.jpg
    starlabattachments3.jpg
    81.5 KB · Views: 9
  • STARLABATTACHMENTS4.jpg
    STARLABATTACHMENTS4.jpg
    51.4 KB · Views: 7
  • STARLABATTACHMENTS5.jpg
    STARLABATTACHMENTS5.jpg
    78.7 KB · Views: 9
Last edited:
Something like this. I need to figure out how to have the rms arm folded at the start.

I think I might go for the upper attachment. As it is you would need to to move the arm for the solar to rotate. here is the ssrmsd part in the scn.
SSRMS:SSRMSD STATUS Orbiting Earth RPOS -3436146.852 373.459 6107823.740 RVEL -6573.3295 0.1168 -3697.6847 AROT 108.895 48.551 -114.697 VROT -0.0065 -0.0556 -0.0519 ATTACHED 1:0,STARLAB RCSMODE 2 AFCMODE 7 PRPLEVEL 0:1.000000 NAVFREQ 582 466 ARM_STATUS 0.000000 0.000000 -3.462129 106.430460 0.000000 0.000000 0.000000 ACTIVE_LEE 1 FOLDED 1 1.0000 ACTIVE_CAMERA 0 CAM_STATUS 0.000000 0.000000 0.000000 0.000000 @SUBSYSTEM LEE1 ATTACHED_PAYLOAD STARLAB 0 BASE @ENDSUBSYSTEM ;LEE1 @SUBSYSTEM LEE2 @ENDSUBSYSTEM ;LEE2 END
 

Attachments

  • STARLABATTACHMENTS6.jpg
    STARLABATTACHMENTS6.jpg
    93 KB · Views: 4
  • STARLABATTACHMENTS7.jpg
    STARLABATTACHMENTS7.jpg
    39 KB · Views: 4
As long as you have the elbow joint set to +180, pressing the K key should fold it.
 
Thanks. I am going to relook at the stowed position. The rms is folded but it folds in. It needs to fold out. MAybe on the other side?
 

Attachments

  • STARLABATTACHMENTS8.jpg
    STARLABATTACHMENTS8.jpg
    37.7 KB · Views: 4
I may need to relocate the rms. I can reach the top port or the side rms.
 

Attachments

  • starlabdeploy2.jpg
    starlabdeploy2.jpg
    66.3 KB · Views: 16
  • starlabdeploy3.jpg
    starlabdeploy3.jpg
    72.2 KB · Views: 16
  • starlabdeploy4.jpg
    starlabdeploy4.jpg
    110.9 KB · Views: 15
  • starlabdeploy5.jpg
    starlabdeploy5.jpg
    42.2 KB · Views: 15
  • stralabdeploy1.jpg
    stralabdeploy1.jpg
    76.5 KB · Views: 17
Trying to see how the arm gets from stowage to the 2 attachments on the body. Here it is attached on top. Not sure how you can get to bottom side attachment??

Looking at images the arm looks different lots of black boxes on the joints.
 

Attachments

  • starlabrmsreach.jpg
    starlabrmsreach.jpg
    60.1 KB · Views: 4
Oh WOW !! Will be way cool to fly through this be sure to change out the astronauts for guys in brown flight suits and might need to add a unmanned space suit attached to the floor in the big room.
 
You might think about doing the Docking Module with the ATM controls inside . might think about one of your guys to move around like the EVA tethered guy to be able to fly around through out the station
Picture 1 shows the window in the wardroom , pic 2 is inside the multiple Docking Adapter, and pic 3 shows the empty suits store in the big room
 

Attachments

  • ABsuits.png
    ABsuits.png
    1.3 MB · Views: 5
  • ABCAA.png
    ABCAA.png
    681.3 KB · Views: 5
  • 2006-18605.jpg
    2006-18605.jpg
    154.2 KB · Views: 5
So we get this for the top of the dome. And from the table view and window. This is more/less launch state and not tables set up,..... I can add those and press a key and now a table is set up.

The next area from the top of the dome is the airlock.

combining the exterior with the interior is the key.

I can add the empty suit also. I might move one guy down by the table.
 

Attachments

  • skylabinter.exter.jpg
    skylabinter.exter.jpg
    67.1 KB · Views: 8
  • skylabwindowview.jpg
    skylabwindowview.jpg
    80.8 KB · Views: 8
  • skylkabtopnew.jpg
    skylkabtopnew.jpg
    47.3 KB · Views: 8
Airlock and MDA. Lots of details to add. Might just texture them in. If I add every box,.... I might slow the graphics down.

3 interior hatches. top of the workstation. bottom of the airlock and at the top of the airlock. and then the eva hatch.

And now that someone can go back to the wall need to fix things
 

Attachments

  • skylabairlockmodule1.jpg
    skylabairlockmodule1.jpg
    58.9 KB · Views: 2
  • skylabairlockmodule2.jpg
    skylabairlockmodule2.jpg
    83.6 KB · Views: 2
Back
Top